Web Service Module
The Web Service Module provides a RESTful API to receive events or messages from external sources. After you add and configure the module, Resolve Actions Express discovers all authenticated messages and translates them as incoming events for triggering automated workflows. Along with each incoming event generated, the Web Service module dynamically maps each attribute forwarded into variables for use in workflow design.
The maximum size of an incoming payload to the Web Service module is 52 MB.
Prerequisites
The following provisions must be made before configuring the module.
HTTPS Configuration
To use the Web Service module, you need to have a .PEM file certificate with a private key. The certificate must be installed using Windows Certificate Manager under Personal > Certificates for each Actions Express server defined as a module instance of the Web Service module.
See How to Update Web Service SSL Certificate for details.
Installing the Module
Use the Actions Express installer to add the module. You can add it during a fresh installation, or later as an update.
Fresh Installation
Choose whether to install the module on the same machine as the main Actions Express services or on a separate machine.
Integrated Module Installation
Take these steps to install the module on the same machine as the main Actions Express application.
- Run the Actions Express installer and click Next.
- Accept the license agreement and click Next.
- Select an installation location and click Next.
- Select the installation type (Single Tenant or Multi Tenant) and click Next.
If you select Multi Tenant, you are prompted for an additional multi-tenant installation key. - On the Choose Installation type screen, select Create new Actions Express environment/Upgrade after uninstalling and click Next.
- On the Custom Setup screen, ensure that Integration Packs > Actions Express Web Service is marked for installation on the local hard drive.
- Click Next and complete the installation as usual.
Standalone Module Installation
Take these steps to install the module on a machine separate from the main Actions Express application.
- Run the Actions Express installer and click Next.
- Accept the license agreement and click Next.
- Select an installation location and click Next.
- Select the installation type (Single Tenant or Multi Tenant) and click Next.
If you select Multi Tenant, you are prompted for an additional multi-tenant installation key. - On the Choose Installation type screen, select Install standalone components and click Next.
- On the Custom Setup screen, ensure that all components are deselected except Integration Packs > Actions Express Web Service and then click Next.
- On the next screen, click Install and wait for the installation to complete.
- Click Finish to close the installation wizard.
Existing Installation
If you are already running Actions Express and want to add the module, take the following steps:
- Run the Actions Express installer and click Next.
- On the Program Maintenance screen, click Modify and click Next.
- On the Custom Setup screen, expand Integration Packs and ensure that Actions Express Web Service is marked for installation on the local hard drive.
- Click Next.
- On the next screen, click Install and wait for the installation to complete.
- Click Finish to close the installation wizard.
Advanced Module Settings
Some module settings that are common between all modules and are rarely used can only be changed directly in the Resolve DB. See a subset of these settings.
Creating the Module Instance
You need to configure a module instance for each Web Service server that you want to integrate with.
- Go to Main Menu > Configuration > Modules.
- From the top right corner of Integrations, click +.
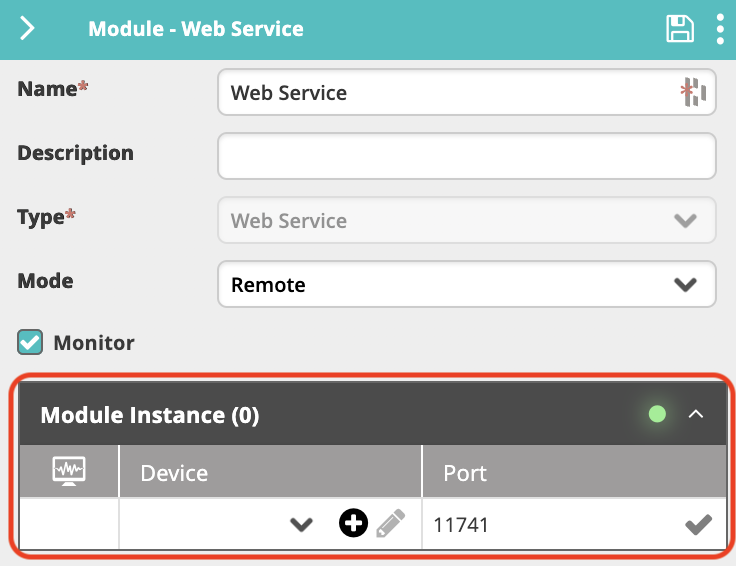
The module properties screen appears. - In the Name field, enter a name for the new module instance.
It is a good practice to provide a descriptive name to let you distinguish between multiple module instances of the same type. - (optional) In the Description field, enter a description for the module instance.
- From the Type field, select Web Service.
- In Mode, select where you want the module instance to run:
- Local—The module instance will run in your local deployment of Actions Express. This option is suitable for integration with services that run in the same network or cloud services that are accessible from the network.
- Remote—The module instance will run on the server where you installed the remote executor (installing a remote executor is needed when the server does not have access to the SQL DB). This option is suitable for integration with services that run in a separate network and are normally not accessible from the main network where Actions Express runs.
- Check Monitor if you want Actions Express to monitor the module instance.
By selecting this option, a new incident is created when the instance is down. - When you have one or more Web Service modules installed on remote machines, you can select to which remote Web Service module you want to connect. Select the device where the module instance is installed from Module Instance > Device, as well as the Port through which it will communicate.
- If you haven't predefined a Device within Incident Configuration, you can click the plus icon to add a new Device directly from this screen. Enter a Name and an IP Address within the configuration, where the Name must be resolvable within DNS (FQDN) or IP Address.
- Click Save to create the module.
- In the Connection Parameters section, specify the Web Service server connection details:
- In the Protocol field, select the protocol to be enabled (HTTP or HTTPS).
- Selecting HTTPS will enable the Certificate and Password fields.
- In the Webhook URL field, enter the endpoint of the type
http://<IP or hostname>:<port>/<additionalInformation>/orhttps://<IP or hostname>:<port>/<additionalInformation>/, where:- The URL must start with
http://orhttps://to match the selected protocol.cautionIf you select HTTPS protocol but enter an HTTP URL (or vice versa), the module configuration will not return an error when saving, but the integration will fail and not accept any web requests.
- The URL must end with a trailing slash (
/). IP/hostname—Enter either thehostnameor the IP of the host defined in the module instance settings where the Web Service is installed.noteFor environments running more than a single module instance for high availability or load balancing, the assigned URL must be with a
hostname.<port>—We recommended defining a custom port to prevent an overlap with existing IIS defaults80and443.noteThe port must differ from the one specified in Module Instance > Device.
noteWhen changing an existing port, you need to run the following command to remove the binding between the certificate and the port:
netsh http delete sslcert ipport=0.0.0.0:<your-new-port-number>- (optional)
<additionalInformation>—You can append additional information to the address to define a unique path (for exampleExpressAPI).
- The URL must start with
- In the Certificate field, browse and select a PEM certificate.
- In the Password field, enter the private key for the certificate. This is done by opening the Private Key file in a text editor, copying its content, and pasting it into the Password field.
- Secret—Each Web Service module requires defining an API token referred to as Secret within the module configuration. This string must be provided in each API request and can be included as a header named
"auth", or within the message body. - Click Test Connection to verify your connection with the server.
A valid connection is indicated with a green tick icon.
- In the Protocol field, select the protocol to be enabled (HTTP or HTTPS).
- Click Save again to complete this section of the configuration.
- In the Configuration Options section, specify additional generic module instance options:
- Log Level—Select how verbose you want the module-related log messages to be. Level 1 is the least verbose.
The log file is located in the module's installation folder (
C:\Program Files\Resolve\Actions Express Web Serviceby default).
- Log Level—Select how verbose you want the module-related log messages to be. Level 1 is the least verbose.
The log file is located in the module's installation folder (
- Click Save.
Communicating with the Web Service Module
The Web Service module enables external sources to:
- Send requests to Actions Express;
- Retrieve the response to these requests generated by Actions Express.
- Reply to the Web Service Response activity
Sending a Request to Actions Express
This request allows you to send data to Actions Express through the Web Service module.
HTTP Method
POST
Headers
Content-Type(required)—Indicates the media type of the body. Supported values:application/json,application/xml.
Query Parameters
Some data can be passed as query parameters. See Body Format for details.
Body Format
Requests can be sent in the following formats:
- XML (text/xml)
- JSON
List of body parameters:
auth(string, required)—Authenticates the request and must match the secret key set within the module instance configuration (Secret field). It can also be passed as a query parameter.sessionid(string, required)—Unique identifier of a successfully generated Actions Express event:- It can also be passed as a query parameter.
- Value
0—Actions Express will auto-generate a unique GUID for the new event and will return it in the reply assessionid. Use the returned value in consequent requests to keep working within the same session. - Any other value—Actions Express will assign the provided string to the new event.
timeout(string, optional)—Maximum time (in seconds) asessionidis active within Actions Express. It can also be passed as a query parameter. Default is600.<additional parameters>(string, optional)—With each web request, you can pass additional key-value pairs that are auto-mapped to variables for use in conditions and workflows.
Response
The Web Service module replies with one of the status codes listed below.
| Status Code | Description |
|---|---|
| 200 | Success |
| 400 | Malformed message or missing information |
| 401 | Invalid auth key provided |
On success, the Web Service module includes the following response, where the sessionid value is either auto-generated or is the value that you specified as part of the request. The response content type is determined by the request's response type.
- XML
- JSON
<?xml version="1.0"?>
<WebServiceResponse xmlns:xsd="http://www.w3.org/2001/XMLSchema" xmlns:xsi="http://www.w3.org/2001/XMLSchema-instance">
    <sessionid>a6968fae-cc64-4689-89ec-ba339cc4132b</sessionid>
</WebServiceResponse>
{
    "Response":null,
    "sessionid":"a6968fae-cc64-4689-89ec-ba339cc4132b"
}
Examples
In the following example, we request an auto-generated sessionid, set a timeout to two minutes, and pass three custom parameters (eventDetail1, eventDetail2, eventDetail3).
- XML
- JSON
<?xml version="1.0" encoding="UTF-8"?>
<root>
    <sessionid>0</sessionid>
    <timeout>120</timeout>
    <eventDetail1>Web Service 1</eventDetail1>
    <eventDetail2>Web Service 2</eventDetail2>
    <eventDetail3>Web Service 3</eventDetail3>
</root>
{
    "sessionid": "0",
    "timeout": "120",
    "eventDetail1": "Web Service 1",
    "eventDetail2": "Web Service 2",
    "eventDetail3": "Web Service 3"
}
Example response:
- XML
- JSON
<?xml version="1.0"?>
<WebServiceResponse xmlns:xsd="http://www.w3.org/2001/XMLSchema" xmlns:xsi="http://www.w3.org/2001/XMLSchema-instance">
    <sessionid>a6968fae-cc64-4689-89ec-ba339cc4132b</sessionid>
</WebServiceResponse>
{
    "Response":null,
    "sessionid":"a6968fae-cc64-4689-89ec-ba339cc4132b"
}
In the following example, we set our own sessionid, use the default ten-minute timeout, and pass two custom parameters (firstName and lastName).
- XML
- JSON
<?xml version="1.0" encoding="UTF-8"?>
<root>
    <sessionid>a1b23c4b5e</sessionid>
    <firstName>John</firstName>
    <lastName>Wick</lastName>
</root>
{
    "sessionid": "a1b23c4b5e",
    "firstName": "John",
    "lastName": "Wick"
}
Example response:
- XML
- JSON
<WebServiceResponse xmlns:xsd="http://www.w3.org/2001/XMLSchema" xmlns:xsi="http://www.w3.org/2001/XMLSchema-instance">
    <sessionid>a1b23c4b5e</sessionid>
</WebServiceResponse>
{
    "Response":null,
    "sessionid":"a6968fae-cc64-4689-89ec-ba339cc4132b"
}
Retrieving a Response from Actions Express
You can use the Web Service Response activity to generate an asynchronous response to the Sending a Request to Actions Express request. This is in addition to the synchronous response that you receive when making the initial request.
This mechanism gives you enough time to process the data in your workflow without risking timing out. After the workflow completes, use the method described in this section to get the result asynchronously. Because your client code can't know when the workflow will complete, it makes sense to send the GET request periodically until you receive a code 200.
HTTP Method
GET
Headers
No headers are required.
Query Parameters
Supported query parameters:
auth(string, required)—Authenticates the request and must match the secret key defined within the module instance configuration. Its value comes from the Secret parameter of the module instance configuration.query(string, required)—Thesessionidof the sessions created with the Sending a Request to Actions Express request.
Response
The Web Service module replies with one of the status codes listed below.
| Status Code | Description |
|---|---|
| 200 | Success |
| 202 | Active sessionid but a workflow hasn't triggered a web response activity |
| 400 | Malformed message or missing information |
| 401 | Invalid auth key provided |
| 404 | Invalid sessionid or sessionid expired |
On success, the Web Service module includes a JSON response where the Response property is the message text that you set in the Web Service Response activity:
{
    "Response":"Event received and workflow completed",
    "sessionid":null
}
Examples
In the following example, Actions Express responds with a code 200 (Success) message and the message text that you set in the Web Service Response activity:
http://server01.domain.com:8200/ExpressAPI/?auth=A123456&query=ee6a7479-587d-478f-ab12-b50598a322af
The response will be:
{
    "Response":"Event received and workflow completed",
    "sessionid":null
}
Replying to Web Service Response Activity
This request allows you to send additional data to the Web Service Response activity when its Wait for input parameters is set to Yes. To find out what the requested additional data is, use the Retrieving a Response from Actions Express request.
Replying with the additional data must happen within the same session.
After sending the additional data, you can get the result by running the Retrieving a Response from Actions Express request one more time.
HTTP Method
POST
Headers
Content-Type(required)—Indicates the media type of the body. Supported values:application/json,application/xml.
Body Format
Requests can be sent in the following formats:
- XML
- JSON
List of body parameters:
auth(string, required)—Authenticates the request and must match the secret key set within the module instance configuration (Secret field).sessionid(string, required)—Thesessionidof the sessions created with the Sending a Request to Actions Express request.message(string, required)—Additional data requested by the Web Service Response activity.<additional parameters>(string, optional)—With each reply, you can send additional parameters on top of the requestedmessage. When the activity's Response is set to All, these parameters are posted as the result of the Web Service Response activity.
Response
The Web Service module replies with one of the status codes listed below.
| Status Code | Description |
|---|---|
| 200 | Success |
| 307 | URL is missing trailing slash. |
| 400 | Malformed message or missing information |
| 401 | Invalid auth key provided |
| 404 | Invalid sessionid or sessionid expired |
Examples
In this example, we are replying to a waiting Web Service Response activity with a message and three additional parameters (eventDetail1, eventDetail2, eventDetail3).
- XML
- JSON
<?xml version="1.0" encoding="UTF-8"?>
<root>
    <sessionid>a6968fae-cc64-4689-89ec-ba339cc4132b</sessionid>
    <message>webserver01</message>
    <eventDetail1>Web Service 1</eventDetail1>
    <eventDetail2>Web Service 2</eventDetail2>
    <eventDetail3>Web Service 3</eventDetail3>
</root>
{
    "sessionid": "a6968fae-cc64-4689-89ec-ba339cc4132b",
    "message": "WebServer01",
    "eventDetail1": "Web Service 1",
    "eventDetail2": "Web Service 2",
    "eventDetail3": "Web Service 3"
}
Example response:
- XML
- JSON
<WebServiceResponse xmlns:xsd="http://www.w3.org/2001/XMLSchema" xmlns:xsi="http://www.w3.org/2001/XMLSchema-instance">
    <sessionid>a6968fae-cc64-4689-89ec-ba339cc4132b</sessionid>
</WebServiceResponse>
{
  "Response":null,
  "sessionid":"a6968fae-cc64-4689-89ec-ba339cc4132b"
}
In the following JSON example, we are replying to a waiting Web Service Response activity with only the requested message.
{
    "sessionid": "a1b23c4b5e",
    "message": "John Wick"
}
Example response:
{
    "Response":null,
    "sessionid":"a1b23c4b5e"
}
Limitations
Currently, the Actions Express Web Service API does not support the flattening of JSON arrays, like in the example below:
 {
    "sessionid": "0",
    "timeout": "120",
    "eventDetail1": "Web Service 1",
    "eventDetail2": "Web Service 2",
    "eventDetail3": "Web Service 3",
    "eventDetail4": "Web Service 4",
    "eventDetail5": [
        {"data1": "test1"},
        {"data2": "test2"},
        {"data3": "test3"}
                    ]
}
Instead, use an alternative like this:
 {
    "sessionid": "0",
    "timeout": "120",
    "eventDetail1": "Web Service 1",
    "eventDetail2": "Web Service 2",
    "eventDetail3": "Web Service 3",
    "eventDetail4": "Web Service 4",
    "eventDetail5_data1": "test1",
    "eventDetail5_data2": "test2",
    "eventDetail5_data3": "test3"
}
Viewing Incoming Requests
Incoming requests can be viewed from the Main Menu under Insight > Audit Trail. They will be listed under the Web Service module name assigned within the module configuration.

To see details about a specific event, click in its row in the Audit Trail. The details will be displayed in the Activity Log panel below.
To see details about a returned message, click the green arrows in the desired row of the Message column. This is an example of how they will look:

Each request parameter is displayed as a row in the Key column. It is automatically mapped as a variable that you can use to access the parameter's value in workflows—for example: %eventDetail1%, %eventDetail2%, %eventDetail3%.
Each event includes the following details:
DateTime: The timestamp of the receiving of the event.Message: The request body in XML format.sessionid: Unique identifier associated with this event.Raw: The raw post request sent.Rawjson: A JSON representation ofRaw.- Additional parameters sent. In our example, this was
%eventDetail1%,%eventDetail2%,%eventDetail3%.
Using %body% as a variable in a workflow will return the entire row data.
Checking the Status of the Web Service
You can obtain real-time information about the status of the Web Service module at the following endpoints:
http://<IP or locahost>:<port>/<custom-endpoint>/statushttps://<IP or locahost>:<port>/<custom-endpoint>/status
Status Codes
The following status codes apply to the GET HTTP method.
| Status Code | Description |
|---|---|
| 200 | Web Service module operational |
| Any other | Error response indicating an issue - see Troubleshooting |
Automating an Incoming Event
Sending a request to the Web Service module generates an event in Actions Express, visible in the Audit Trail. To automate the event, you need to create a trigger for a workflow.
Triggers for the Web Service module work by matching a global variable with the data received in the event. If you want to react to multiple values of the same parameter, repeat the following procedure for each of them, creating separate global variables.
Take these steps to automate the event coming in from the Web Service module:
- Create a global variable that matches the data that you expect to receive from the external source:
- For Name, enter the exact name of a parameter received as part of the incoming request's body.
Matching a single body parameter is enough to trigger an automation. - For Mode, select Set Variable's Value on Every Incident Update.
- Type cannot be set in this use case.
- Leave Value empty.
- For Name, enter the exact name of a parameter received as part of the incoming request's body.
- Create the Workflow that will automate the event if it doesn't already exist.
You can create a non-functioning workflow and build it later. - Create a trigger for a workflow:
- When prompted to create a Condition, configure it as follows:
- Set Condition Clause to And.
- Under Condition Logic, add an entry for the global variable as follows:
- Type—Global Variables.
- Module Form—Cannot be set in this use case.
- Object—Select the global variable that you created for this automation.
- Operator—Equals.
- Value—The exact value of the parameter from the request's body that matches the global variable.
- (Optional) If you want to limit the trigger to a specific module instance, add a second entry under Condition Logic:
- Type—Standard Object.
- Module Form—Cannot be set in this use case.
- Object—Select Source.
- Operator—Equals.
- Value—Select the name of the Web Service module. note
The Web Service module name appears in the drop-down list only if it has received at least one event. If it hasn't received any events, you can still type in the module name, keeping the original spelling.
- When prompted to create a Trigger, configure it as follows:
- Ensure that Enabled is checked.
You might want to leave it unchecked if you are yet to build the workflow. - Under Conditions, create an entry as follows:
- Condition—Select the condition that you created for this event.
- Workflow—Select the workflow that you created for this event.
- Optionally, set the rest of the options as needed.
- Ensure that Enabled is checked.
- When prompted to create a Condition, configure it as follows:
The selected workflow will execute the next time that the Web Service module receives the parameter and value combination that you specified. If you added the optional condition, the trigger will only execute the workflow in case the event originated in the specified module instance.
Troubleshooting
Use this information to resolve common issues that might occur with this integration module.
HTTP Status/Response Codes
| Status Code | Description |
|---|---|
| 307 | Temporary redirect notice: URL is missing trailing slash. |
| 400 | Bad request: The JSON/XML request is malformed/formatted incorrectly. |
| 401 | Unauthorized: Incorrect secret key/password. |
| 404 | Unknown address: Attempting to reach the Web Service API at the wrong URL. |
Related Activities
To use the Actions Express Web Service activities, open the Workflow Designer in the Main Menu Builder section. Search, browse, or click the + in the canvas area to find the desired activity and add it to the workflow.
Currently, one Web Service activity is available: